How to Create a Purchase Order: A Step-by-Step Guide for Beginners
Learn how to create a purchase order from scratch. This beginner-friendly step-by-step guide covers every field, explains the PO process, and includes a free template.
BT
Bizcalc Team
·May 5, 2026
Every time your business buys something from a supplier — whether that's raw materials, finished goods, software licences, or professional services — you are entering into a financial commitment. Without a formal document to record exactly what you ordered, how much you agreed to pay, and when you expect delivery, you are leaving your business vulnerable to disputes, accounting errors, and budget overruns.
That formal document is the purchase order (PO).
In this step-by-step guide, we will explain exactly what a purchase order is, why your business needs one, and walk you through every field you need to fill in when creating your first professional purchase order.
📋
Free Purchase Order Generator
Create a professional, branded purchase order PDF in minutes. Auto-calculated totals, sequential PO numbering, and no account required.
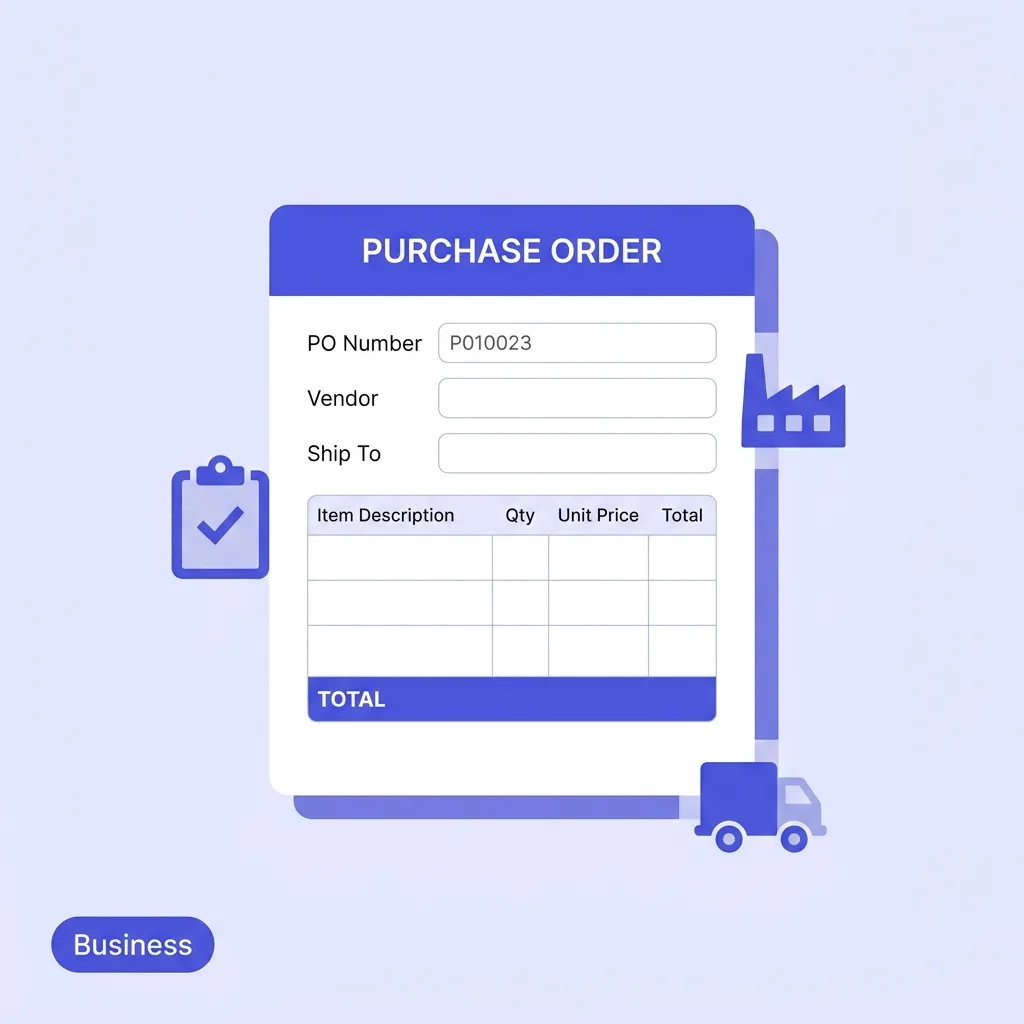
A purchase order is a legally binding commercial document issued by a buyer to a seller. It formally specifies the items the buyer wants to purchase, the quantities required, the agreed price, and the expected delivery date.
When a vendor receives and accepts a PO, it creates a contract. The seller is legally committed to supplying the specified goods at the agreed price, and the buyer is legally committed to paying for them upon satisfactory delivery.
The Benefits of Using Purchase Orders
For small businesses and growing companies, introducing a PO process delivers significant advantages:
Benefit
Why It Matters
Price Lock-In
The vendor cannot unilaterally raise prices after accepting a PO.
Budget Control
Management can approve spending before it is committed, not after.
Dispute Resolution
Clear documentation of what was agreed makes it easy to resolve discrepancies.
Inventory Tracking
PO numbers link to incoming stock, making warehouse management easier.
Audit Trail
Tax authorities and auditors expect documented evidence of business expenditure.
Step-by-Step: How to Create a Purchase Order
Step 1: Gather Your Vendor Information
Before you open your purchase order template, you need the complete, accurate details of the supplier you are ordering from.
Collect the following from your vendor:
Company Name — exactly as it appears on their official registration
Business Address — often the headquarters or invoicing address
Contact Person — the sales representative or account manager handling your order
Vendor ID or Account Number — if your business has one assigned to them in your system
Getting this right from the start prevents your PO from being routed to the wrong department or sitting in a vendor's inbox unread.
Step 2: Assign a Unique PO Number
Every purchase order must have a unique, sequential identification number. This number is the single most important field on the document because every subsequent document — the vendor's invoice, the packing slip, the goods receipt — will reference it.
Common PO Numbering Formats:
PO-2026-0001 — Year-based, easy to archive
PO-00042 — Simple sequential
VENDOR-001 — Vendor-specific series (useful if you order from few suppliers)
Never reuse a PO number. Once assigned, it is permanently tied to that transaction.
Step 3: Enter the Date and Required Delivery Date
Two dates must appear on every purchase order:
Issue Date: The date you are creating and sending the PO.
Required Delivery Date: The date by which you need the goods or services delivered.
The required delivery date is more than a preference — it forms part of your contractual terms with the vendor. If they fail to deliver by this date, you have documented grounds for escalating the issue or pursuing remedies under your purchase agreement.
Step 4: Fill in the "Bill To" and "Ship To" Addresses
For many businesses, the billing address (where the invoice should be sent) and the shipping address (where the goods should be physically delivered) are completely different.
Bill To: Your company's registered address, or your accounts payable department's address
Ship To: Your warehouse, office, or specific job site address
If you have multiple warehouses or locations, always specify the exact site. Vague delivery instructions are a leading cause of shipment delays and disputes.
Step 5: Define Your Payment Terms
Payment terms specify when the vendor can expect to receive money after they deliver the goods and issue their invoice. These should be agreed upon with the vendor before you create the PO, as some vendors have non-negotiable standard terms.
Payment Term
What It Means
Due on Receipt
Payment is expected immediately when the invoice arrives
Net 7 / Net 14
Payment is due 7 or 14 days after the invoice date
Net 30
Payment is due 30 days after the invoice date (most common B2B term)
Net 60
Payment is due 60 days after the invoice date (common for larger corporates)
2/10 Net 30
A 2% discount is offered if the buyer pays within 10 days, otherwise Net 30 applies
Agreeing to terms that are too short can put pressure on your cash flow. Terms that are too long can damage your relationship with key suppliers.
Step 6: List All Line Items in Detail
This is the heart of the purchase order. For every distinct product or service you are ordering, create a separate line item. Each line must include:
Item Code or SKU (if applicable) — enables the vendor to quickly locate the product in their catalogue
Description — a clear, specific description of what you are ordering
Quantity — the exact number of units required
Unit of Measure — pieces, kilograms, litres, hours, etc.
Unit Price — the agreed price per unit (this is the price you negotiated)
Line Total — Quantity × Unit Price
Example Line Items:
#
SKU
Description
Qty
Unit
Unit Price
Total
1
SKU-4421
A4 White Copy Paper — 80gsm, Ream of 500
20
Reams
$4.50
$90.00
2
SKU-7012
Black Ballpoint Pens — Box of 50
5
Boxes
$7.80
$39.00
3
SKU-1198
Desk Stapler — Heavy Duty
3
Each
$14.95
$44.85
Be as specific as possible. If you order "pens" when you needed "black ballpoint pens," you have no documented grounds for rejecting a delivery of red marker pens.
Step 7: Add Shipping and Handling Costs
If the vendor is charging for delivery, freight, or insurance, this should appear as a separate line item at the bottom of your order, clearly labelled as "Shipping & Handling" or "Freight."
In international orders, you should also specify the Incoterms — the internationally standardised trade terms that define exactly who is responsible for shipping costs and insurance at each stage of the journey (e.g., EXW, FOB, CIF, DDP). Without agreed Incoterms, import duty and freight disputes are common.
Step 8: Calculate and Display the Order Total
Below all line items, your PO must show a clear financial summary:
Taxes — Applicable local taxes such as VAT, GST, or sales tax
Grand Total — The total financial commitment the buyer is making
This grand total is what the vendor will use to verify that their subsequent invoice matches the agreed terms.
Step 9: Add Special Instructions or Terms
The notes section at the bottom of the PO is your opportunity to add any context the vendor needs to fulfil the order correctly:
Specific packaging requirements (e.g., "All items must be individually bubble-wrapped")
Labelling requirements (e.g., "Each box must be labelled with the PO number and SKU")
Quality standards references (e.g., "All goods must comply with ISO 9001")
Return policy (e.g., "Vendor must accept return of damaged or incorrect goods at their cost")
For recurring supplier relationships, many businesses attach a copy of their standard Terms and Conditions document to the PO.
Step 10: Review, Approve, and Send
Before sending the PO, ensure it goes through the appropriate internal approval process. Most businesses use a tiered approval structure:
Order Value
Approval Required
Under $500
Department Manager
$500 – $5,000
Finance Manager
Over $5,000
Director or CFO
Once approved, send the PO to the vendor via email (as a PDF) and request a written confirmation that they have received and accepted it. This confirmation is what activates the contract.
📋
Free Purchase Order Generator
Fill in all the fields, get auto-calculated totals, and download a clean PDF to send to your vendor instantly.
Once the vendor accepts the PO, here is the rest of the procurement cycle:
Vendor Ships the Goods: The vendor prepares and ships your order, often including a packing slip that lists the items in the shipment.
Goods Receipt: When the delivery arrives, your warehouse or receiving team checks the actual goods against the PO (checking quantity and quality).
Vendor Issues an Invoice: The vendor sends an invoice referencing the PO number and billing for the goods they supplied.
Three-Way Match: Your accounts payable team compares the PO, the goods receipt, and the invoice to ensure they all align before approving payment.
Payment: You pay the invoice according to the agreed payment terms.
Understanding this full cycle helps you appreciate why every field on the PO matters — it is the anchor document for every downstream verification step.
Create Your First Purchase Order in Minutes
Now that you understand exactly how to create a purchase order, the fastest way to put this into practice is to use a purpose-built tool that handles formatting and calculations for you.
Our Free Purchase Order Generator lets you fill in all the fields described above, auto-calculates line totals and the grand total, and generates a clean, professional PDF ready to send to your vendor — no subscription, no sign-up required.
For the complementary side of procurement, when your vendor sends you an invoice that needs to be paid or when you need to bill your own customers, check out our free invoice generator.
🧾
Free Invoice Generator
When your vendor's invoice arrives, verify it matches your PO. Or issue your own invoices to customers with consistent branding.
Creating a purchase order involves determining your needs, selecting a supplier, negotiating terms, drafting the formal PO document, obtaining internal approval, and sending it to the vendor.
Who creates a purchase order?
The buyer (or a purchasing/procurement manager within the buying company) creates and issues the purchase order to the seller.
What is a blanket purchase order?
A blanket purchase order is an agreement to buy a specific quantity of goods over a set period of time, often at a negotiated discount, with multiple deliveries scheduled later.
Can a purchase order be rejected?
Yes, a supplier can reject a purchase order if they cannot fulfill the requested quantities, disagree with the proposed prices, or cannot meet the delivery timeline.
Why do some purchase orders require internal approval?
Internal approvals prevent unauthorized spending. For example, a company might require manager approval for any PO over $500 to ensure the purchase is within budget.
#how to create a purchase order#how to make a purchase order#purchase order process#purchase order template#what is a purchase order